Implementing Register and Login in Cloudflare Workers with D1
Recently, I was building on a new Cloudflare Workers backend and needed a very simple authentication system, that would allow registration and login for a frontend application. After searching around I didn’t find a good example or tutorial about this topic, so I decided to build my own.
You can see the full code of this example in this authentication-using-d1-example github repo.
In this example, I will be using:
- hono for routing
- chanfana for OpenAPI generation and validation
- workers-qb for querying D1
Table of Contents
- Project setup
- Users register endpoint
- Users login endpoint
- Authenticating routes
- Application router
- Final Result
1. Project setup
First, install dependencies with the following commands.
npm install --save-dev wrangler@^3.74.0
npm install --save workers-qb@^1.5.2
npm install --save hono@^4.5.11
npm install --save chanfana@^2.0.4"
For this project you will need to define a SALT_TOKEN that is used in the password hash generation, this can be any
string and you can generate it in a password generator or just write something yourself. It is also recommended, that
after you follow this tutorial you move this variable from the wrangler.toml into a Cloudflare secret.
You will also need a D1 database, but this can always be adapted to use another database or your own PostgreSQL instance.
After you have installed and logged in wrangler, go ahead and create a new D1 database with the following command.
wrangler d1 create <db-name> --experimental-backend
Update your wrangler.toml with the SALT_TOKEN and D1 binding.
name = "d1-auth-example"
main = "src/index.ts"
compatibility_date = "2024-09-01"


[[d1_databases]]
binding = "DB"
database_name = "d1-auth-example"
database_id = "e90ca6b1-4de8-4b88-821a-0b7af3e40dc2"

[vars]
SALT_TOKEN = "sadfasdghjyt45645t"
Now bootstrap your database by creating the initial tables for storing users and user sessions.
wrangler d1 execute DB --local --command="create table users
(
    id       integer primary key autoincrement,
    email    text not null unique,
    password text not null,
    name     text not null
);"

wrangler d1 execute DB --local --command="create table users_sessions
(
    session_id integer primary key autoincrement,
    user_id    integer not null
        constraint users_sessions_users_id_fk
            references users
            on update cascade on delete cascade,
    token      text not null,
    expires_at integer    not null
);"
2. Users register endpoint
The password must not be saved in raw text in the database and for this, we can use a very simple SHA-256 to generate
a hash that represents the password.
This function receives the raw password + the SALT_TOKEN we defined earlier to generate a unique token.
async function hashPassword(password: string, salt: string): Promise<string> {
    const utf8 = new TextEncoder().encode(`${salt}:${password}`);

    const hashBuffer = await crypto.subtle.digest({name: 'SHA-256'}, utf8);
    const hashArray = Array.from(new Uint8Array(hashBuffer));
    return hashArray
        .map((bytes) => bytes.toString(16).padStart(2, '0'))
        .join('');
}
Then in the actual endpoint code we just need to call this function when we are inserting the new user.
import {z} from 'zod'
import {OpenAPIRoute} from "chanfana";
import {D1QB} from "workers-qb";
import {User, UserSession} from "../types";

export class AuthRegister extends OpenAPIRoute {
    schema = {
        tags: ['Auth'],
        summary: 'Register user',
        request: {
            body: {
                content: {
                    'application/json': {
                        schema: z.object({
                            name: z.string(),
                            email: z.string().email(),
                            password: z.string().min(8).max(16),
                        }),
                    },
                },
            },
        },
        responses: {
            '200': {
                description: "Successful response",
                content: {
                    'application/json': {
                        schema: z.object({
                            success: z.boolean(),
                            result: z.object({
                                user: z.object({
                                    email: z.string(),
                                    name: z.string()
                                })
                            })
                        }),
                    },
                },
            },
            '400': {
                description: "Error",
                content: {
                    'application/json': {
                        schema: z.object({
                            success: z.boolean(),
                            error: z.string()
                        }),
                    },
                },
            },
        },
    };

    async handle(c) {
        // Validate inputs
        const data = await this.getValidatedData<typeof this.schema>()

        // Get query builder for D1
        const qb = new D1QB(c.env.DB)

        try {
            // Try to insert a new user
            await qb.insert<{ email: string, name: string, }>({
                tableName: 'users',
                data: {
                    email: data.body.email,
                    name: data.body.name,
                    password: await hashPassword(data.body.password, c.env.SALT_TOKEN),
                },
            }).execute()
        } catch (e) {
            // Insert failed due to unique constraint on the email column
            return Response.json({
                success: false,
                errors: "User with that email already exists"
            }, {
                status: 400,
            })
        }

        // Returning an object, automatically gets converted into a json response
        return {
            success: true,
            result: {
                user: {
                    email: data.body.email,
                    name: data.body.name,
                }
            }
        }
    }
}
Here you can see that we are defining the request.body that are our endpoint parameters and the responses This will
be used by chanfana to validate the input parameters before our code gets executed.
Then inside the handle function we are trying to insert a new user, if an exception is raised during this, it is very
likely due to the uniqueness of the email, the user is trying to register.
3. Users login endpoint
Now for the login endpoint, all we need to do is call the function that generates the password hash from the raw
password and the SALT_TOKEN and check against the database, if a user is found, generate a session token and return it.
import {z} from 'zod'
import {OpenAPIRoute} from "chanfana";
import {D1QB} from "workers-qb";
import {User, UserSession} from "../types";

export class AuthLogin extends OpenAPIRoute {
    schema = {
        tags: ['Auth'],
        summary: 'Login user',
        request: {
            body: {
                content: {
                    'application/json': {
                        schema: z.object({
                            email: z.string().email(),
                            password: z.string().min(8).max(16),
                        }),
                    },
                },
            },
        },
        responses: {
            '200': {
                description: "Successful response",
                content: {
                    'application/json': {
                        schema: z.object({
                            success: z.boolean(),
                            result: z.object({
                                session: z.object({
                                    token: z.string(),
                                    expires_at: z.number().int()
                                })
                            })
                        }),
                    },
                },
            },
            '400': {
                description: "Error",
                content: {
                    'application/json': {
                        schema: z.object({
                            success: z.boolean(),
                            error: z.string()
                        }),
                    },
                },
            },
        },
    };

    async handle(c) {
        // Validate inputs
        const data = await this.getValidatedData<typeof this.schema>()

        // Get query builder for D1
        const qb = new D1QB(c.env.DB)

        // Try to fetch the user
        const user = await qb.fetchOne<User>({
            tableName: 'users',
            fields: '*',
            where: {
                conditions: [
                    'email = ?1',
                    'password = ?2'
                ],
                params: [
                    data.body.email,
                    await hashPassword(data.body.password, c.env.SALT_TOKEN)
                ]
            },
        }).execute()

        // User not found, provably wrong password
        if (!user.results) {
            return Response.json({
                success: false,
                errors: "Unknown user"
            }, {
                status: 400,
            })
        }

        // User found, define expiration date for new session token
        let expiration = new Date();
        expiration.setDate(expiration.getDate() + 7);

        // Insert session token
        const session = await qb.insert<UserSession>({
            tableName: 'users_sessions',
            data: {
                user_id: user.results.id,
                token: await hashPassword((Math.random() + 1).toString(3), c.env.SALT_TOKEN),
                expires_at: expiration.getTime()
            },
            returning: '*'
        }).execute()

        // Returning an object, automatically gets converted into a json response
        return {
            success: true,
            result: {
                session: {
                    token: session.results.token,
                    expires_at: session.results.expires_at,
                }
            }
        }
    }
}
4. Authenticating routes
Now for authenticating users, we just need to validate that the frontend client is sending a session token, then check if is in the database and it has not expired yet.
As said above, this is a very simple authentication system, and this can be improved if necessary, a very good improvement could be to instead of using a string token for sessions, use a JWT to encapsulate the token, then this authentication function could validate that the session token is valid without querying the database and improving the performance of the application.
export function getBearer(request: Request): null | string {
    const authHeader = request.headers.get('Authorization')
    if (!authHeader || authHeader.substring(0, 6) !== 'Bearer') {
        return null
    }
    return authHeader.substring(6).trim()
}


export async function authenticateUser(c, next) {
    const token = getBearer(c.req.raw)

    // Get query builder for D1
    const qb = new D1QB(c.env.DB)

    let session

    if (token) {
        session = await qb.fetchOne<UserSession>({
            tableName: 'users_sessions',
            fields: '*',
            where: {
                conditions: [
                    'token = ?1',
                    'expires_at > ?2',
                ],
                params: [
                    token,
                    new Date().getTime()
                ]
            },
        }).execute()
    }

    if (!token || !session.results) {
        return Response.json({
            success: false,
            errors: "Authentication error"
        }, {
            status: 401,
        })
    }

    // This will be accessible from the endpoints as c.get('user_uuid')
    c.set('user_uuid', session.results.user_uuid)

    await next()
}
Here you can see that we are expecting the session token to be placed in the Authorization header, but this piece
can easily be adapted to expect the session token to be inside a cookie or anywhere needed.
5. Application router
To wrap things up, it’s just needed to setup the application router that tight things together.
Due to limitations in the current implementation of chanfana, it’s very important that the endpoint routes
are defined in the following way:
- Endpoints that don’t require Auth
- Authentication middleware
- Endpoints that require Auth
For the testing purposes we will also create a search endpoint that retrieves repos from the github api.
import {z} from "zod";
import {OpenAPIRoute} from "chanfana";

export class GetSearch extends OpenAPIRoute {
    schema = {
        tags: ["Search"],
        summary: "Search repositories by a query parameter",
        request: {
            query: z.object({
                q: z.string().default('cloudflare workers').openapi({
                    description: "The query to search for"
                })
            })
        },
        responses: {
            "200": {
                description: "Successful response",
                content: {
                    'application/json': {
                        schema: z.object({
                            success: z.boolean(),
                            result: z.object({
                                name: z.string(),
                                description: z.string(),
                                stars: z.number().int(),
                                url: z.string()
                            }).array()
                        }),
                    },
                },
            },
            "401": {
                description: "Not authenticated",
                schema: {
                    "success": false,
                    "errors": "Authentication error"
                },
            },
        },
    };

    async handle(c) {
        // Validate inputs
        const data = await this.getValidatedData<typeof this.schema>()

        const resp = await fetch(`https://api.github.com/search/repositories?q=${data.query.q}`, {
            headers: {
                Accept: "application/vnd.github.v3+json",
                "User-Agent": "RepoAI - Cloudflare Workers ChatGPT Plugin Example",
            },
        });

        if (!resp.ok) {
            return new Response(await resp.text(), {status: 400});
        }

        const json = await resp.json();

        // @ts-ignore
        const repos = json.items.map((item: any) => ({
            name: item.name,
            description: item.description,
            stars: item.stargazers_count,
            url: item.html_url,
        }));

        // Returning an object, automatically gets converted into a json response
        return {
            success: true,
            result: repos,
        };
    }
}
And now the router code that defines all paths to endpoints.
import {GetSearch} from "./endpoints/search";
import {authenticateUser, AuthLogin, AuthRegister} from "./foundation/auth";
import {Hono} from "hono";
import {fromHono} from "chanfana";
import {Bindings} from "./types";

// Start a Hono app
const app = new Hono<{ Bindings: Bindings }>()

// Setup OpenAPI registry
const openapi = fromHono(app, {
    schema: {
        info: {
            title: "Authentication using D1",
            version: '1.0',
        },
        security: [
            {
                bearerAuth: [],
            },
        ],
    },
    docs_url: "/",
})
openapi.registry.registerComponent('securitySchemes', 'bearerAuth', {
    type: 'http',
    scheme: 'bearer',
})

// 1. Endpoints that don't require Auth
openapi.post('/api/auth/register', AuthRegister);
openapi.post('/api/auth/login', AuthLogin);


// 2. Authentication middleware
openapi.use('/api/*', authenticateUser)


// 3. Endpoints that require Auth
openapi.get("/api/search", GetSearch);


// 404 for everything else
openapi.all("*", () => new Response("Not Found.", {status: 404}));

// Export the Hono app
export default app
6. Final Result
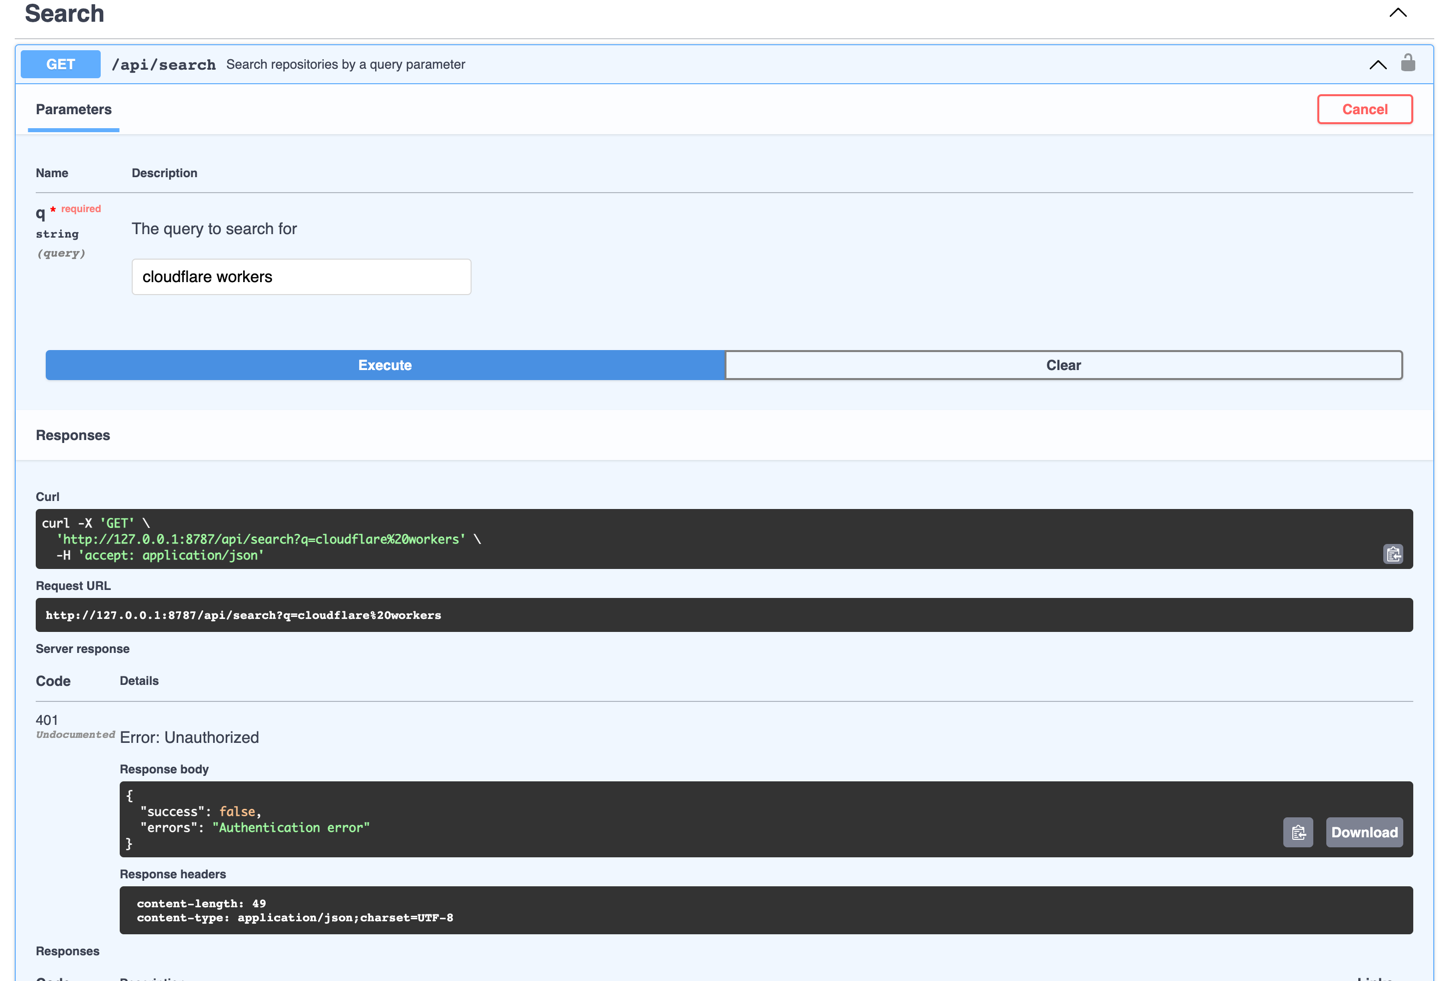
Now when executing the project and opening the browser at http://127.0.0.1:8787/ you will see a swagger interface were you can test the endpoints.

Then you may call the search test endpoint, and be greeted with the error message saying that you are not authenticated.
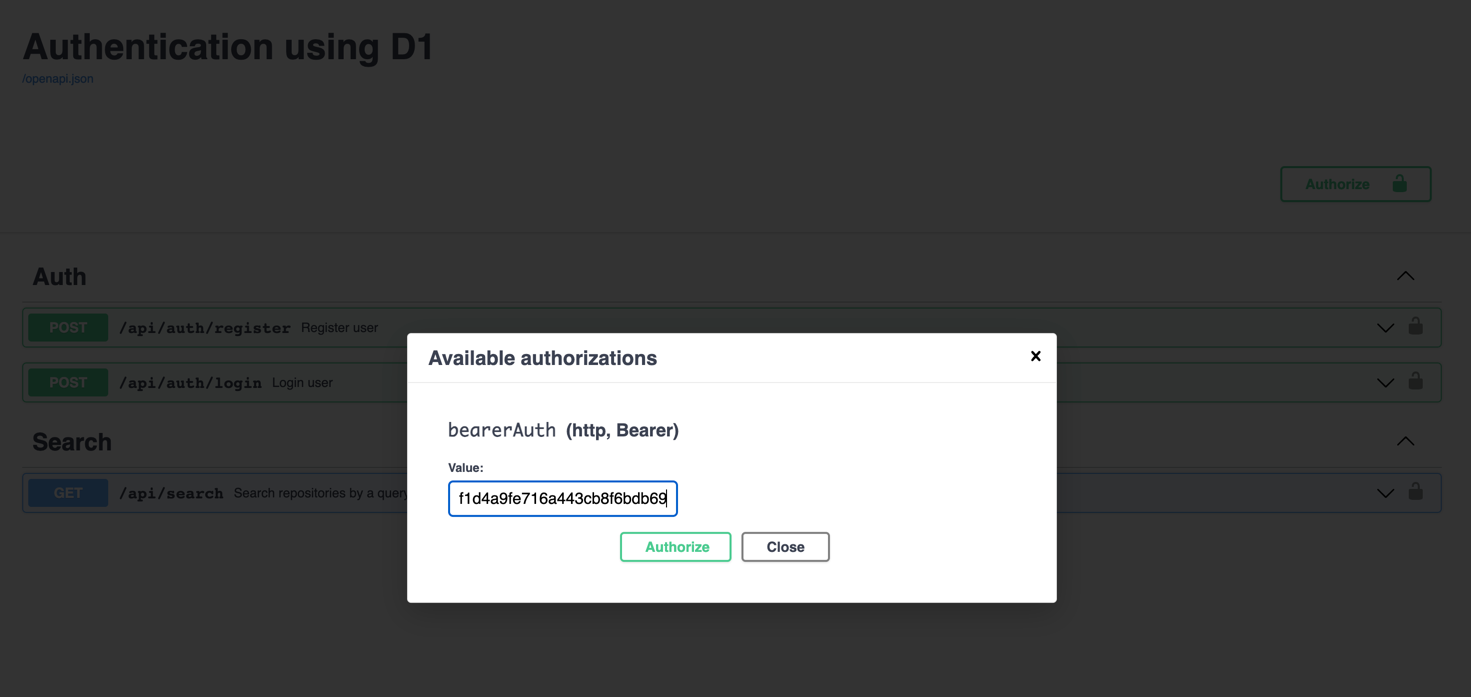
Then after calling the register endpoint with the desired credentials and then calling the login endpoint with the same credentials as before, you will receive a bearer token and an expiration date.
Now use the token to set your authentication in the swagger.
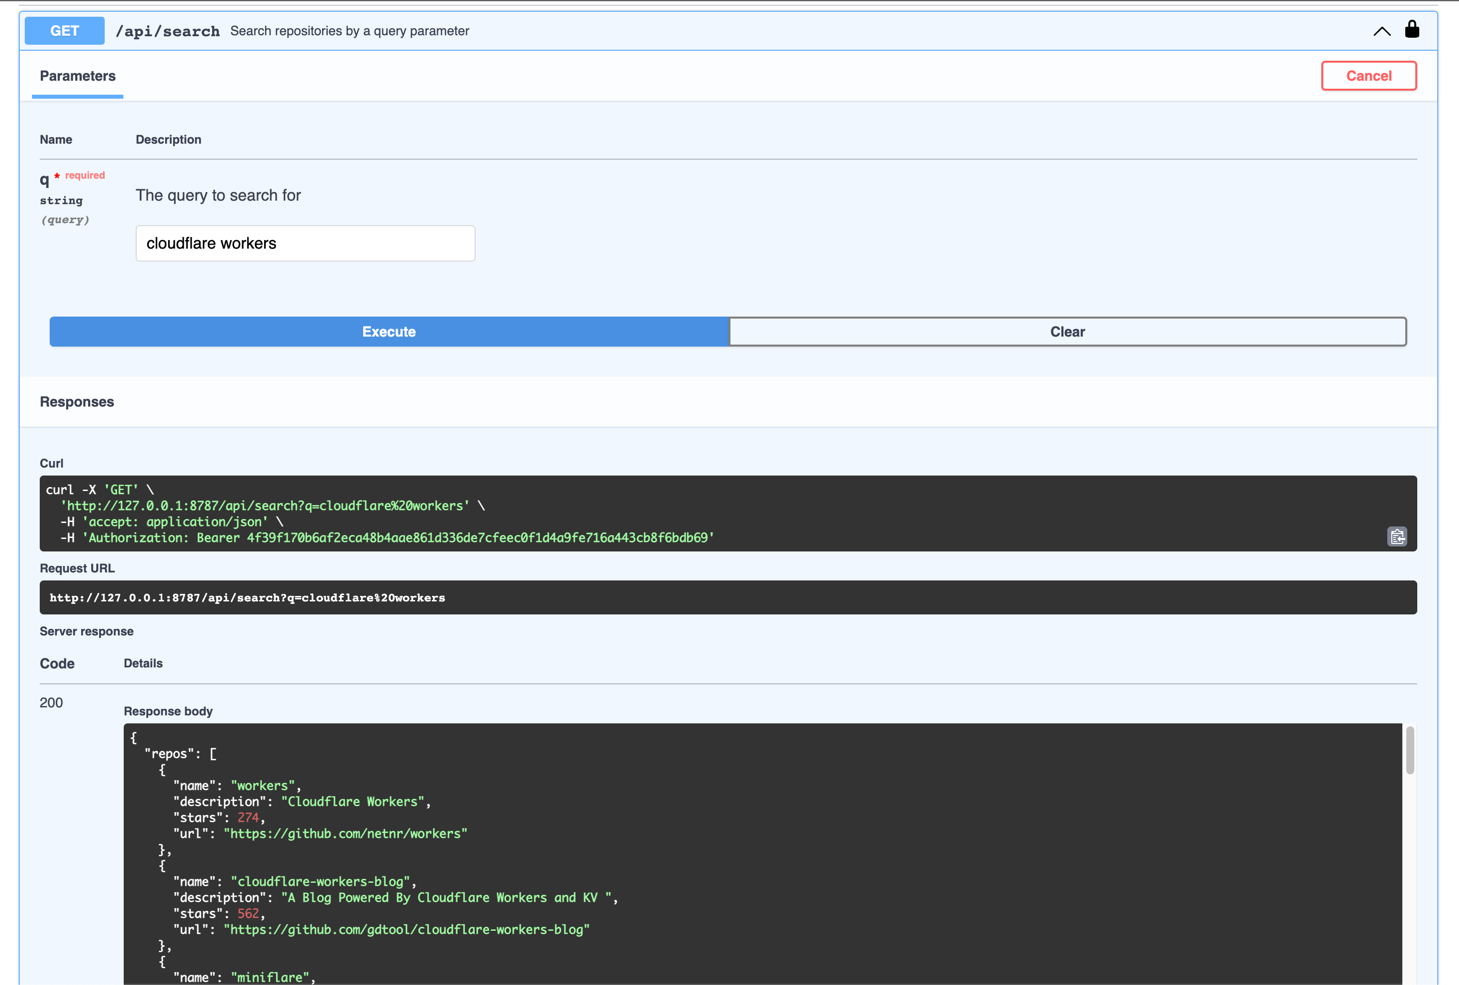
Now calling the search test endpoint will actually return results.
You can see the full code of this example in this authentication-using-d1-example github repo.